Dishwashers are the silent heroes of your kitchen, tirelessly cleaning dirty plates, glasses and cutlery. The problem is that although dishwashers are machines, they also need to be maintained in everyday life to keep them performing, because as they are used for longer, food residues, grease, soap scum, and mineral deposits can clog up their parts inside the dishwasher. This will affect the performance of the dishwasher and also affect the life of the dishwasher. So here are some guidelines for cleaning your dishwasher.
Why cleaning your dishwasher is so important
Why cleaning your dishwasher is so important, if you don’t maintain it regularly, apart from affecting the performance, it will also have an odor. It will also have the following problems:
- Reduces cleaning effectiveness: a dirty dishwasher can leave stains or film on glassware.
- Creates odors: leftover food and mold can make the dishwasher smell like last week’s leftovers.
- Reduces lifespan: clogs and mineral deposits can burden the dishwasher, leading to costly repairs.
- Breeds bacteria and mold: a dirty dishwasher can harbor bacteria and affect the hygiene of your dishes.
What You’ll Need
You don’t need fancy tools to get your dishwasher sparkling. Here’s a list of supplies, most of which you likely already have:
- White vinegar: A natural, acidic cleaner to break down grease and limescale.
- Baking soda: Neutralizes odors and tackles stubborn residue.
- Dish soap: For cleaning filters and spray arms.
- Soft toothbrush or small brush: To scrub filters and hard-to-reach spots.
- Microfiber cloth or sponge: For wiping down surfaces.
- Toothpick or skewer: To clear clogs in spray arms.
- Optional: Commercial dishwasher cleaner (e.g., Affresh® or Cascade Platinum Dishwasher Cleaner) for a deeper clean.
- Optional: Stainless steel cleaner (for exterior polishing, if applicable).
Cleaning Steps
This is a detailed dishwasher cleaning guide that we have prepared, you can follow the steps below to get a good clean for your average dishwasher.
Step 1: Empty and check the dishwasher
Start by emptying the dishwasher. Remove all the dishes, utensils and shelves so that you can clean the interior well. Also pull out the bottom shelf and check the bottom drain area for food scraps, small debris (such as popcorn kernels or glass residue) or standing water. Wipe away any visible dirt with a paper towel or rag. This quick step will prevent clogs and keep odors at bay.
PRO TIP: If you notice standing water, it may indicate a clogged drain or filter. Address these issues before proceeding to prevent dirty water from recirculating.
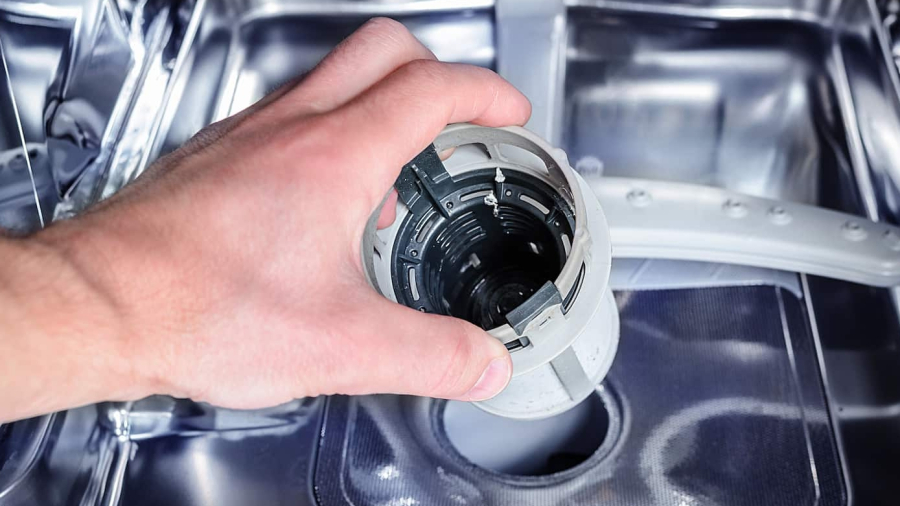
Step 2: Clean the filters
The screens are an important part of the cleaning process. They are located under the spray arm at the bottom of the dishwasher, and clogged screens are a common cause of dishwasher odors and dishware stains.
- Finding the filter: Most filters are cylindrical in shape and are removed by turning counterclockwise. Some models come with a second flat screen. If unsure, check the manual.
- Remove and soak: Place the colander in the sink or bowl with hot water and a few drops of dishwashing liquid. To enhance cleaning, add a little white vinegar to remove grease. Soak for 5-10 minutes.
- Scrub and Rinse: Use a soft-bristled toothbrush or sponge to gently scrub residue, focusing on the strainer and plastic parts. Avoid hard brushes that may damage the screen. Rinse thoroughly with warm water and reinstall securely.
Step 3: Cleaning the spray arm
Clean the spray arm as this has small holes in it which can sometimes get clogged and you will need to check this specifically.
- Check and unclog: Use a toothpick or bamboo skewer to pick out food or mineral residue from the spray arm hole. Soak the spray arm in a 1:1 mixture of warm water and white vinegar for 15 minutes to dissolve scale.
- Rinse and reinstall: Rinse with lukewarm water, towel dry, and reinstall, making sure the spray arms can spin freely.
- PRO TIP: Before turning off the dishwasher, quickly rotate the spray arm to make sure it is not blocked by dish racks or dishes.
Step 4: Clean the Door and Gasket
The rubber gasket (the seal around the door) and door edges are prime spots for mold, mildew, and food buildup.
- Wipe the gasket: Mix a solution of ½ cup white vinegar and 3 cups hot water. Dip a soft toothbrush or cloth in the solution and gently scrub the gasket, focusing on crevices where grime hides. Wipe clean with a damp cloth. Avoid harsh cleaners, as they can degrade rubber.
- Clean the door edges and interior: Use a microfiber cloth with warm, soapy water to wipe down the door’s interior, edges, and control panel. For stubborn spots, make a paste with baking soda and water, apply it, let it sit for 10 minutes, then scrub gently and rinse.
Step 5: Run a Vinegar Cleaning Cycle
Vinegar is a powerhouse for breaking down grease, soap scum, and mineral deposits.
- Set up the vinegar: Pour 1–2 cups of white vinegar into a dishwasher-safe container (like a glass measuring cup or bowl). Place it upright on the top rack of the empty dishwasher.
- Run the cycle: Select the hottest water cycle (no detergent) and skip the heated dry option to save energy. The vinegar will disperse, cleaning the interior walls, hoses, and pump.
- Air dry: When the cycle finishes, open the door to let the dishwasher air dry, preventing trapped moisture that could lead to mold.
- Caution: Never combine vinegar with bleach or use bleach in a stainless steel dishwasher, as it can damage the interior or create harmful chlorine gas.
Step 6: Run the Baking Soda Washing Program
Baking soda removes odors and brightens the interior for a newer looking same.
- Sprinkle Baking Soda: After the vinegar wash program, sprinkle a cup of baking soda in the bottom of an empty dishwasher.
- Short Time Wash Program: Select the short time hot water wash program (no detergent) and skip the heat drying step. Open the door to dry when the wash is complete.
- DO NOT MIX WITH VINEGAR: Mixing vinegar and baking soda in the same wash program can create a sudsy reaction and cause stains. Always wash separately.
Step 7: Wipe down the outside of the dishwasher
Never neglect the exterior of your dishwasher! Fingerprints, smudges and grease can dull the appearance of your dishwasher.
- For stainless steel: Use an ammonia-free glass cleaner or a specialized stainless steel cleaner (such as Weiman or Affresh®). Scrub with the grain to avoid scratches.
- For plastic or painted surfaces: Wipe with a damp cloth moistened with mild detergent. Avoid spraying the cleaner directly on the control panel to avoid damaging the electronics.
Step 8: Optional Deep Cleaning with Commercial Cleaners
For stubborn dirt, you can use a professional dishwasher cleaner such as Affresh® or Cascade Platinum Dishwasher Cleaner. These cleaners are specifically designed to deal with limescale and mineral deposits.
Frequency of use: Use once a month or as needed for heavy soiling.
Maintenance tips to keep your dishwasher clean
To keep your dishwasher performing at its best, you need to develop good habits of use, such as:
- After each load: check the drain for food debris and wipe it clean with a paper towel.
- Weekly: wipe down door edges and gaskets with a damp cloth. If the filter does not self-clean, remove and rinse.
- Monthly: Clean with vinegar or commercial cleaner.
- As needed: Polish exterior and check spray arms for clogging.
- Prevent Scale Buildup: Scrape food residue from dishes before loading (no need to pre-rinse), use the proper amount of detergent, and keep the rinse agent dispenser full to prevent spotting.
- Hard water areas: If you have hard water, consider using a citric acid-based cleaner (such as lemon powder or pure citric acid) to remove scale.
Common Problems Troubleshooting
The following are some of the common problems that occur during the use of your dishwasher:
Dishwasher has an odor? Please check the filter or drain for food residue. Use the acetic acid wash program and leave the door half open after washing to allow natural air drying.
Cloudy glassware? This may be limescale from hard water. Use a commercial cleaner or citric acid and be sure to use enough rinse aid.
Dishes still dirty? Make sure the spray arms are clean, use a good quality detergent packet and avoid overloading the dishwasher.
Standing water? Please clean the filter and check that the drain hose is not clogged. If the problem persists, consult a plumber.
Final Thoughts
Cleaning your dishwasher might not be the most glamorous task, but it’s a small effort that pays off in sparkling dishes, a fresher kitchen, and a longer-lasting appliance. By following this step-by-step guide—using vinegar, baking soda, and a bit of elbow grease—you can keep your dishwasher running like new. Set a reminder to deep clean it every month (or every other month for light use), and incorporate quick maintenance checks into your routine. Your dishes (and your nose) will thank you!